N Syk asked:
Jun 21, 2019


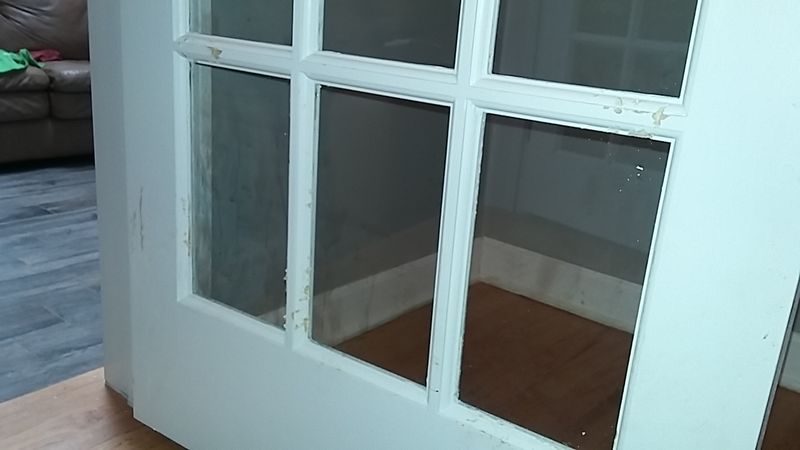
As with the previous comments, you can use sandpaper to smooth out some of the damage, but be sure to rub the scratches along the grain of the wood. Next, apply mineral spirits (these are solvents made from paint thinner and petroleum) over the sanded area. Spread on wood filler with a Spackle knife to the damaged parts and allow it to dry as per the filler’s directions. After the wood filler has dried, lightly sand the area once again and brush away any dust before priming and painting your door.
While the image shows damage to the inside of your door, your pet may try scratching on the outside of door and its weather stripping in an attempt to be let inside. In order to prevent future damage to that part of your door, you can add a piece of vinyl lattice that matches the color of your doorframe. Cut the lattice to the length of the doorjamb. Place it over your foam weather stripping. Check to see that your door continues to close properly. Use finishing nails every foot to tack the vinyl lattice securely in place. A small amount of spackling will cover up the nail heads. Now the lattice will protect your weather stripping from further damage.
The right type of door for your home can make a huge difference. We install ProVia doors and they offer DuraGuard Series Storm Doors, which are ideal for keeping pets safely inside with their non-removable stainless steel screening.
Best of luck with your dog and your door repair!


I have seen a lot of great DIY carpenter bee traps that fill up with bees. I have friends that say the traps keep them out of the house.
https://www.pinterest.com/explore/carpenter-bee-trap/

I believe Home Depot has some aerosol products that can nearly reach 40 ft, but not positive.

I would concur with the above answers. If you are able to fill with wood putty and paint that would prove to be the most cost effective option. If you would like to go further, determine the brand of the door and I'm sure you could find a replacement sash. I am like you, I love my dog like my children, continue to be patient and show your bowser the love he deserves.

There is a bee spray you can mix in a pump up and reach the higher carpenter bee holes. This worked for me.

Bee spray typicaqlly has a really far reach or an exterminator.

Consider, a new dog

There are a few options depending on the circumstances, if the dog has scratched the slab and depending on material, you'll need an entirely new slab. You have the option of painting over the scratch, but the odds of that peeling into the future are high. Our doors are steel and fibreglass, fibreglass would require an entirely new door slab to be installed if you wish to rid the problem for good. To surely rid the problem, the dog or puppy should be trained before repair unless you want to experience a fruitness endeavour.
When dealing with a wooden door, their are a few DIY solutions like sanding, filling sanding again and painting/staining over.
It looks like the pup teaches classes on how to be a beaver 101. Sanding, filling and matching the colour back would be the best option in this circumstance, or simply an entirely new replacement.

It looks like the dog did a pretty good job on the door. Since the door is painted, you could sand the area down with some 150 grit sand paper. After it is sanded then you can apply some High performance wood filler or car bondo.
Apply a thin layer over the damaged area and allow it dry ( a few minutes or more depending on the amount of hardener you use). After it is dry, sand untill smooth and then apply a second layer if you need to and then sand smooth. After the area is the way you want it, prime it and paint it.


The combination of answers above is pretty inclusive. The first responder's comments get you to the construction phase. I would add that recommendations from friends sometimes fall short if your project is of a different nature than theirs. Be sure your contractor has a track record in the type project you are considering.,
Our estimates list out detail of the work scope included and an overall cost. When moving to the contract phase we submit a schedule of values that will be used for percentage complete pay apps.
As far as the construction process, this would be our normal progression:
protection - provision for temp lighting if needed
demolition and temp arrangements for appliance usage if needed
framing of new walls, floors or beams
rough plumbing If needed
rough electric for lights, appliances etc
hvac or venting as needed
insulation
drywall
tile prep, underlayment
tile or hardwood installation
more protection before cabinets to protect finished floors
install cabinets
install trim (base/crown etc)
measure/install countertops
install appliances
paint (sometimes this will move ahead of countertops)
backsplashes
plumbing finish
electrical finish
cabinet hardware
provide & perform punch list
remove protection
test electric, plumbing, appliance function
Note: inspections required vary by jurisdiction but for our area it will generally include foundation if an addition is involved, framing if structural changes, rough plumbing, rough electric insulation, final plumbing, final electric, certificate of occupancy.
Hope this helps
hire a licensed pro and avoid the pitfalls.

The above are two good, and siilar in approach answers, but there are two issues it seems no one includes:
1) If you house was built before 1978 it must be inspected by a certified contractor or lead paint inspector for lead paint before a remodel is started. If found the paint, or paintd material must be prperly abated. This can be a significant cost item.
2) Most remodel items like tile, cabinets, and paint are considered minor and don't require it in most jurisdictions, but electrical, plumbing, HVAC, and structural modifications require permits and inspections. A homeowner can save money by omitting them, but if you get busted, you'l pay and you may be without a kitchen for a long time.
Robert Johnson
Southern Home Improvement, LLC
Georgia